在全球同服的游戏架构中,网络结构一般设计成集群的形式,用户随便在哪个服务器节点上都可以玩,也就要求每个节点的环境都是一致的,节点之间是可以自由下线上线的,用户是可以在每个节点自由注册的…等等,各种需求的出现,会需要一款能主动发现节点上线线,能统计全局所有服务器负载、状态,能实时下发配置等信息到所有节点的这么一款软件,那么就用到 ETCD 了。
etcd 作为 高可用分布式配置同步的软件,一般只对内网服务,偶尔也会暴露到外网。不管是内网,还是外网,都需要安全认证这一步,而其默认是有以及用户名、密码的认证方式,只是需要对每一个索引做权限设定。etcd 官方也后 TSL 的认证,同时也只是 HTTPS 形式传输数据,以确保哪怕在内网传输,也保证数据安全性。
ETCD server的配置的下载地址:https://github.com/coreos/etcd/releases/download/v3.2.7/etcd-v3.2.7-linux-amd64.tar.gz ,解压后,可看到其版本信息
root@cnxct:/data/etcd/etcd-v3.2.7-linux-amd64# ./etcd --version
etcd Version: 3.2.7
Git SHA: bb66589
Go Version: go1.8.3
Go OS/Arch: linux/amd64
如果不需要证书,不需要鉴权就可以访问,则可以直接使用了。。。
对于需要确保加密传输,需要权限认证的服务,那么还是需要证书来保证的,关于证书生成,,借助工具 cfssl
mkdir ~/bin
curl -s -L -o ~/bin/cfssl https://pkg.cfssl.org/R1.2/cfssl_linux-amd64
curl -s -L -o ~/bin/cfssljson https://pkg.cfssl.org/R1.2/cfssljson_linux-amd64
chmod +x ~/bin/{cfssl,cfssljson}
export PATH=$PATH:~/bin
为了确保游戏集群管理的 ETCD 的高可用,一般都会有多个 ETCD 服务同时运行组成一个 ETCD 的集群。 ETCD 才调用 RAFT 的算法进行主节点选举,日志同步等等。ETCD 节点之间的通讯,也需要证书的认证。为了便于以后的etcd节点变更,一般都会以域名形式来提供服务,故需要解析几个 etcd 的域名,我这里以etcd1.cnxct.com、etcd2.cnxct.com,同时解析到对应服务器上。我这里的例子是解析到本机。
创建证书临时存放的目录(为了看起来好区别)
mkdir ~/cfssl
cd ~/cfssl
echo '{"CN":"CA","key":{"algo":"rsa","size":2048}}' | cfssl gencert -initca - | cfssljson -bare ca -
echo '{"signing":{"default":{"expiry":"43800h","usages":["signing","key encipherment","server auth","client auth"]}}}' > ca-config.json
export ADDRESS=etcd1.cnxct.com,etcd2.cnxct.com,127.0.0.1
export NAME=server
echo '{"CN":"'$NAME'","hosts":[""],"key":{"algo":"rsa","size":2048}}' | cfssl gencert -config=ca-config.json -ca=ca.pem -ca-key=ca-key.pem -hostname="$ADDRESS" - | cfssljson -bare $NAME
export ADDRESS=
export NAME=client
echo '{"CN":"'$NAME'","hosts":[""],"key":{"algo":"rsa","size":2048}}' | cfssl gencert -config=ca-config.json -ca=ca.pem -ca-key=ca-key.pem -hostname="$ADDRESS" - | cfssljson -bare $NAME
查看一下生成的文件列表:
root@cnxct:~/cfssl# ll
total 48
drwxr-xr-x 2 root root 4096 Sep 15 15:13 ./
drwx------ 7 root root 4096 Sep 15 15:13 ../
-rw-r--r-- 1 root root  112 Sep 15 15:13 ca-config.json
-rw-r--r-- 1 root root  883 Sep 15 15:13 ca.csr
-rw------- 1 root root 1679 Sep 15 15:13 ca-key.pem
-rw-r--r-- 1 root root 1119 Sep 15 15:13 ca.pem
-rw-r--r-- 1 root root  928 Sep 15 15:13 client.csr
-rw------- 1 root root 1679 Sep 15 15:13 client-key.pem
-rw-r--r-- 1 root root 1180 Sep 15 15:13 client.pem
-rw-r--r-- 1 root root  928 Sep 15 15:13 server.csr
-rw------- 1 root root 1675 Sep 15 15:13 server-key.pem
-rw-r--r-- 1 root root 1233 Sep 15 15:13 server.pem
在这里的列表中,分为client.pem公钥,client-key.pem私钥。以及 ca.pem 公钥,以及几个 CSR证书请求文件;ca-key.pem 为 自制 ca 私钥文件,需要妥善保管,不能外泄。
证书生成好了,验证一下证书的有效性
root@cnxct:~/cfssl# openssl x509 -in ca.pem -text -noout
root@cnxct:~/cfssl# openssl x509 -in server.pem -text -noout
root@cnxct:~/cfssl# openssl x509 -in client.pem -text -noout
Certificate:
    Data:
        Version: 3 (0x2)
        Serial Number:
            15:f1:be:ac:e7:29:29:27...10:34:eb:c8:53:b1
    Signature Algorithm: sha256WithRSAEncryption
        Issuer: CN=CA
        Validity
            Not Before: Sep 15 07:08:00 2017 GMT
            Not After : Sep 14 07:08:00 2022 GMT
        Subject: CN=client
        Subject Public Key Info:
            Public Key Algorithm: rsaEncryption
                Public-Key: (2048 bit)
                Modulus:
                    00:a1:73:ce:3d:32......5d:6b:87:
                    2c:57:01:3c:0e:............
                Exponent: 65537 (0x10001)
        X509v3 extensions:
            X509v3 Key Usage: critical
                Digital Signature, Key Encipherment
            X509v3 Extended Key Usage:
                TLS Web Server Authentication, TLS Web Client Authentication
            X509v3 Basic Constraints: critical
                CA:FALSE
            X509v3 Subject Key Identifier:
                EF:75:5B:0E:4A:23:E6:9D:BF:3B:8.........7:48:69:5A:3E
            X509v3 Authority Key Identifier:
                keyid:18:A7:0C:9E:6A:91:.........:31:04:32:0B:A0:46

            X509v3 Subject Alternative Name:
                DNS:
    Signature Algorithm: sha256WithRSAEncryption
         81:2b:da:63:19:64:e0:ff:30:66:2f:a4:2f:95:52:da:47:54:
         7a:88:63.........
如上,目测证书有效。将证书复制到 etcd 的配置目录
 root@cnxct:/data/etcd/etcd-v3.2.7-linux-amd64# mkdir -p /data/etcd/ssl
 root@cnxct:/data/etcd/etcd-v3.2.7-linux-amd64# cp ~/cfssl/*.pem ../ssl/
开始配置etcd的配置文件
我在从官方下载下来的二进制包中 ,并没有配置文件的例子文件,而且网上搜到的,几乎都是早起etcd 2 时代的 linux 上conf 文件常见配置格式(就是那种井号注释的那种)。在 etcd 3,都搞成了 yaml 格式了。
在网上用 google、baidu 搜了好久,压根找不到yaml的例子。后来在 github 官网找到了 yaml 的例子地址 , https://github.com/coreos/etcd/blob/master/etcd.conf.yml.sample ,这个强烈建议 etcd 项目组将这个配置的例子放到打包的二进制压缩包里。
# This is the configuration file for the etcd server.

# Human-readable name for this member.
name: 'cnxct'

# Path to the data directory.
data-dir: '/data/etcd-data'

# Path to the dedicated wal directory.
wal-dir:

# Number of committed transactions to trigger a snapshot to disk.
snapshot-count: 10000

# Time (in milliseconds) of a heartbeat interval.
heartbeat-interval: 100

# Time (in milliseconds) for an election to timeout.
election-timeout: 1000

# Raise alarms when backend size exceeds the given quota. 0 means use the
# default quota.
quota-backend-bytes: 0

# List of comma separated URLs to listen on for peer traffic.
listen-peer-urls: 'https://0.0.0.0:2380'

# List of comma separated URLs to listen on for client traffic.
listen-client-urls: 'https://0.0.0.0:2379'

# Maximum number of snapshot files to retain (0 is unlimited).
max-snapshots: 5

# Maximum number of wal files to retain (0 is unlimited).
max-wals: 5

# Comma-separated white list of origins for CORS (cross-origin resource sharing).
cors:

# List of this member's peer URLs to advertise to the rest of the cluster.
# The URLs needed to be a comma-separated list.
initial-advertise-peer-urls: http://etcd1.cnxct.com:2380

# List of this member's client URLs to advertise to the public.
# The URLs needed to be a comma-separated list.
advertise-client-urls: https://etcd1.cnxct.com:2379

# Discovery URL used to bootstrap the cluster.
discovery:

# Valid values include 'exit', 'proxy'
discovery-fallback: 'proxy'

# HTTP proxy to use for traffic to discovery service.
discovery-proxy:

# DNS domain used to bootstrap initial cluster.
discovery-srv:

# Initial cluster configuration for bootstrapping.
initial-cluster:

# Initial cluster token for the etcd cluster during bootstrap.
initial-cluster-token: 'cnxct-etcd-cluster'

# Initial cluster state ('new' or 'existing').
initial-cluster-state: 'new'

# Reject reconfiguration requests that would cause quorum loss.
strict-reconfig-check: false

# Accept etcd V2 client requests
enable-v2: true

# Valid values include 'on', 'readonly', 'off'
proxy: 'off'

# Time (in milliseconds) an endpoint will be held in a failed state.
proxy-failure-wait: 5000

# Time (in milliseconds) of the endpoints refresh interval.
proxy-refresh-interval: 30000

# Time (in milliseconds) for a dial to timeout.
proxy-dial-timeout: 1000

# Time (in milliseconds) for a write to timeout.
proxy-write-timeout: 5000

# Time (in milliseconds) for a read to timeout.
proxy-read-timeout: 0

client-transport-security:
  # DEPRECATED: Path to the client server TLS CA file.
  ca-file: '/data/etcd/ssl/ca.pem'

  # Path to the client server TLS cert file.
  cert-file: '/data/etcd/ssl/server.pem'

  # Path to the client server TLS key file.
  key-file: '/data/etcd/ssl/server-key.pem'

  # Enable client cert authentication.
  client-cert-auth: true

  # Path to the client server TLS trusted CA key file.
  trusted-ca-file: '/data/etcd/ssl/ca.pem'

  # Client TLS using generated certificates
  auto-tls: true

peer-transport-security:
  # DEPRECATED: Path to the peer server TLS CA file.
  ca-file: '/data/etcd/ssl/ca.pem'

  # Path to the peer server TLS cert file.
  cert-file: '/data/etcd/ssl/server.pem'

  # Path to the peer server TLS key file.
  key-file: '/data/etcd/ssl/server-key.pem'

  # Enable peer client cert authentication.
  client-cert-auth: true

  # Path to the peer server TLS trusted CA key file.
  trusted-ca-file: '/data/etcd/ssl/ca.pem'

  # Peer TLS using generated certificates.
  auto-tls: true

# Enable debug-level logging for etcd.
debug: true

# Specify a particular log level for each etcd package (eg: 'etcdmain=CRITICAL,etcdserver=DEBUG'.
log-package-levels: etcdmain=CRITICAL,etcdserver=DEBUG

# Force to create a new one member cluster.
force-new-cluster: false
这里稍微说一下,在3.1.9时, listen-client-urls 跟 listen-client-urls 两个参数,还是可以直接使用域名来配置的。 3.2.x 就不支持了,只能填正确的 IP 来配置。 initial-advertise-peer-urls跟advertise-client-urls两个参数可继续使用域名形式的地址。
测试一下 CA 证书在 etcd 服务器上是否正常工作
root@cnxct:~/cfssl# openssl s_client -verify 100 -CAfile ca.pem -connect etcd1.cnxct.com:2379
verify depth is 100
CONNECTED(00000003)
depth=1 CN = CA
verify return:1
depth=0 CN = server
verify return:1
140065811416728:error:14094412:SSL routines:ssl3_read_bytes:sslv3 alert bad certificate:s3_pkt.c:1487:SSL alert number 42
140065811416728:error:140790E5:SSL routines:ssl23_write:ssl handshake failure:s23_lib.c:177:
---
Certificate chain
 0 s:/CN=server
   i:/CN=CA
---
Server certificate
-----BEGIN CERTIFICATE-----
MIIDYDCCAkigAwIBAgI
.........
.........
TKFXDw==
-----END CERTIFICATE-----
subject=/CN=server
issuer=/CN=CA
---
Acceptable client certificate CA names
/CN=CA
Client Certificate Types: RSA sign, ECDSA sign
Requested Signature Algorithms: RSA+SHA256:ECDSA+SHA256:RSA+SHA384:ECDSA+SHA384:RSA+SHA1:ECDSA+SHA1
Shared Requested Signature Algorithms: RSA+SHA256:ECDSA+SHA256:RSA+SHA384:ECDSA+SHA384:RSA+SHA1:ECDSA+SHA1
Peer signing digest: SHA384
Server Temp Key: ECDH, P-256, 256 bits
---
SSL handshake has read 1340 bytes and written 138 bytes
---
New, TLSv1/SSLv3, Cipher is ECDHE-RSA-AES128-GCM-SHA256
Server public key is 2048 bit
Secure Renegotiation IS supported
Compression: NONE
Expansion: NONE
No ALPN negotiated
SSL-Session:
    Protocol  : TLSv1.2
    Cipher    : ECDHE-RSA-AES128-GCM-SHA256
    Session-ID:
    Session-ID-ctx:
    Master-Key: 582AFFA41.........7ADE9769AC9A6A
    Key-Arg   : None
    PSK identity: None
    PSK identity hint: None
    SRP username: None
    Start Time: 1505461911
    Timeout   : 300 (sec)
    Verify return code: 0 (ok)
---
同样,测试 client 证书在 etcd 的服务上是否正常使用
root@cnxct:~/cfssl# curl --cacert /data/etcd/ssl/ca.pem --cert /data/etcd/ssl/client.pem --key /data/etcd/ssl/client-key.pem   -L https://etcd1.cnxct.com:2379/v2/keys/foo -XPUT -d value=bar -v
*   Trying 127.0.1.1...
* Connected to etcd1.cnxct.com (127.0.1.1) port 2379 (#0)
* found 1 certificates in /data/etcd/ssl/ca.pem
* found 692 certificates in /etc/ssl/certs
* ALPN, offering http/1.1
* SSL connection using TLS1.2 / ECDHE_RSA_AES_128_GCM_SHA256
* 	 server certificate verification OK
* 	 server certificate status verification SKIPPED
* 	 common name: server (matched)
* 	 server certificate expiration date OK
* 	 server certificate activation date OK
* 	 certificate public key: RSA
* 	 certificate version: #3
* 	 subject: CN=server
* 	 start date: Fri, 15 Sep 2017 07:08:00 GMT
* 	 expire date: Wed, 14 Sep 2022 07:08:00 GMT
* 	 issuer: CN=CA
* 	 compression: NULL
* ALPN, server did not agree to a protocol
> PUT /v2/keys/foo HTTP/1.1
> Host: etcd1.cnxct.com:2379
> User-Agent: curl/7.47.0
> Accept: */*
> Content-Length: 9
> Content-Type: application/x-www-form-urlencoded
>
* upload completely sent off: 9 out of 9 bytes
< HTTP/1.1 201 Created
< Content-Type: application/json
< X-Etcd-Cluster-Id: 965e90621e9f9f0f
< X-Etcd-Index: 4
< X-Raft-Index: 5
< X-Raft-Term: 2
< Date: Fri, 15 Sep 2017 07:52:54 GMT
< Content-Length: 88
<
{"action":"set","node":{"key":"/foo","value":"bar","modifiedIndex":4,"createdIndex":4}}
* Connection #0 to host etcd1.cnxct.com left intact
如上结果,可以看出,两个证书均正常使用。
开始在 Golang 的 client 中使用证书文件:
etcd 本身就是用 golang 语言编写的,项目托管在 etcd 的 github地址,客户端类库在client目录,以及 clientv3下,前一个适用与etcd v2的版本,后一个适用与etcd v3的版本,在 golang 的包里,就是github.com/coreos/etcd/clientv3。在我的项目中,我使用的是v3版本的客户端,使用证书,建立链接的伪代码如下
import (
	"crypto/tls"
	"crypto/x509"
	etcdclient "github.com/coreos/etcd/clientv3"
)
func NewEtcdCluster(etcdAdds []string, keyStatusPrifix, keyConfigPrifix, configDir string) (*EtcdCluster, error) {

var etcdCertPath = configDir + "/etcd/client.pem"
	var etcdCertKeyPath = configDir + "/etcd/client-key.pem"
	var etcdCaPath = configDir + "/etcd/ca.pem"

	// load cert
	cert, err := tls.LoadX509KeyPair(etcdCertPath, etcdCertKeyPath)
	if err != nil {
		return nil, err
	}

	// load root ca
	caData, err := ioutil.ReadFile(etcdCaPath)
	if err != nil {
		return nil, err
	}

	pool := x509.NewCertPool()
	pool.AppendCertsFromPEM(caData)

	_tlsConfig := &tls.Config{
		Certificates: []tls.Certificate{cert},
		RootCAs:      pool,
	}

	cfg := etcdclient.Config{
		Endpoints: etcdAdds,
		TLS:       _tlsConfig,
	}
	client, err := etcdclient.New(cfg)
	if err != nil {
		return nil, err
	}

	cluster := &EtcdCluster{
		keyStatusPrifix: keyStatusPrifix,
		keyConfigPrifix: keyConfigPrifix,
		etcdAdds:        etcdAdds,
		ticker:          time.NewTicker(time.Second * 5),
		nodes:           make(map[uint16]INodeStatus),
		kapi:            client,
	}
    return cluster, err
}
在游戏集群中,游戏服务器的节点在整个集群中是唯一的,每个节点都拥有一个唯一的节点 ID,而这个唯一 ID 在 ETCD 里的注册,需要用到CAS原子性的操作,在 V2的客户但里,是Set方法时,Options的PrevExist参数是 false 来实现。
_, err := this.kapi.Set(etcdcontext.Background(), value.GetKey(), "", &etcdclient.SetOptions{
		TTL:       time.Second * 10, //默认TTL值,要大于心跳包的间隔
		PrevExist: "false",          //CAS操作,等同于 CompareSwap 函数
	})
在 V3里,是Txn来开启事务,实现 CAS 操作
keyName := fmt.Sprintf(this.etcdConfig.Etcd_key_online_prefix, value.GetUuid())
	this.logger.Debug("获取 lease ,3 s")
	ctx, cancel := context.WithTimeout(context.Background(), ETCD_TRANSPORT_TIMEOUT)
	leaseResp, err := this.GetEtcdClient().Grant(ctx, 3)
	cancel()

	if err != nil {
		return err
	}
	ctx, cancel = context.WithTimeout(context.Background(), ETCD_TRANSPORT_TIMEOUT)
	this.logger.Debug("PUT key %s whith lease id :%d",keyName,leaseResp.ID)
	kvc := etcdclient.NewKV(this.kapi)
	var txnResp *etcdclient.TxnResponse
	txnResp, err = kvc.Txn(ctx).
		If(etcdclient.Compare(etcdclient.CreateRevision(keyName), "=", 0)).
		Then(etcdclient.OpPut(keyName, value.GetRegisterInfo(),etcdclient.WithLease(etcdclient.LeaseID(leaseResp.ID)))).
		Commit()
	cancel()

	if err != nil {
		return err
	}
	if !txnResp.Succeeded {
		return fmt.Errorf("无法注册自己:%s ,该 Key 已经存在",keyName)
	}

	ctx, cancel = context.WithTimeout(context.Background(), ETCD_TRANSPORT_TIMEOUT)
	_, err = this.GetEtcdClient().KeepAlive(ctx, leaseResp.ID)
	cancel()

	if err == nil {
		this.selfNodeInfo = value
	}
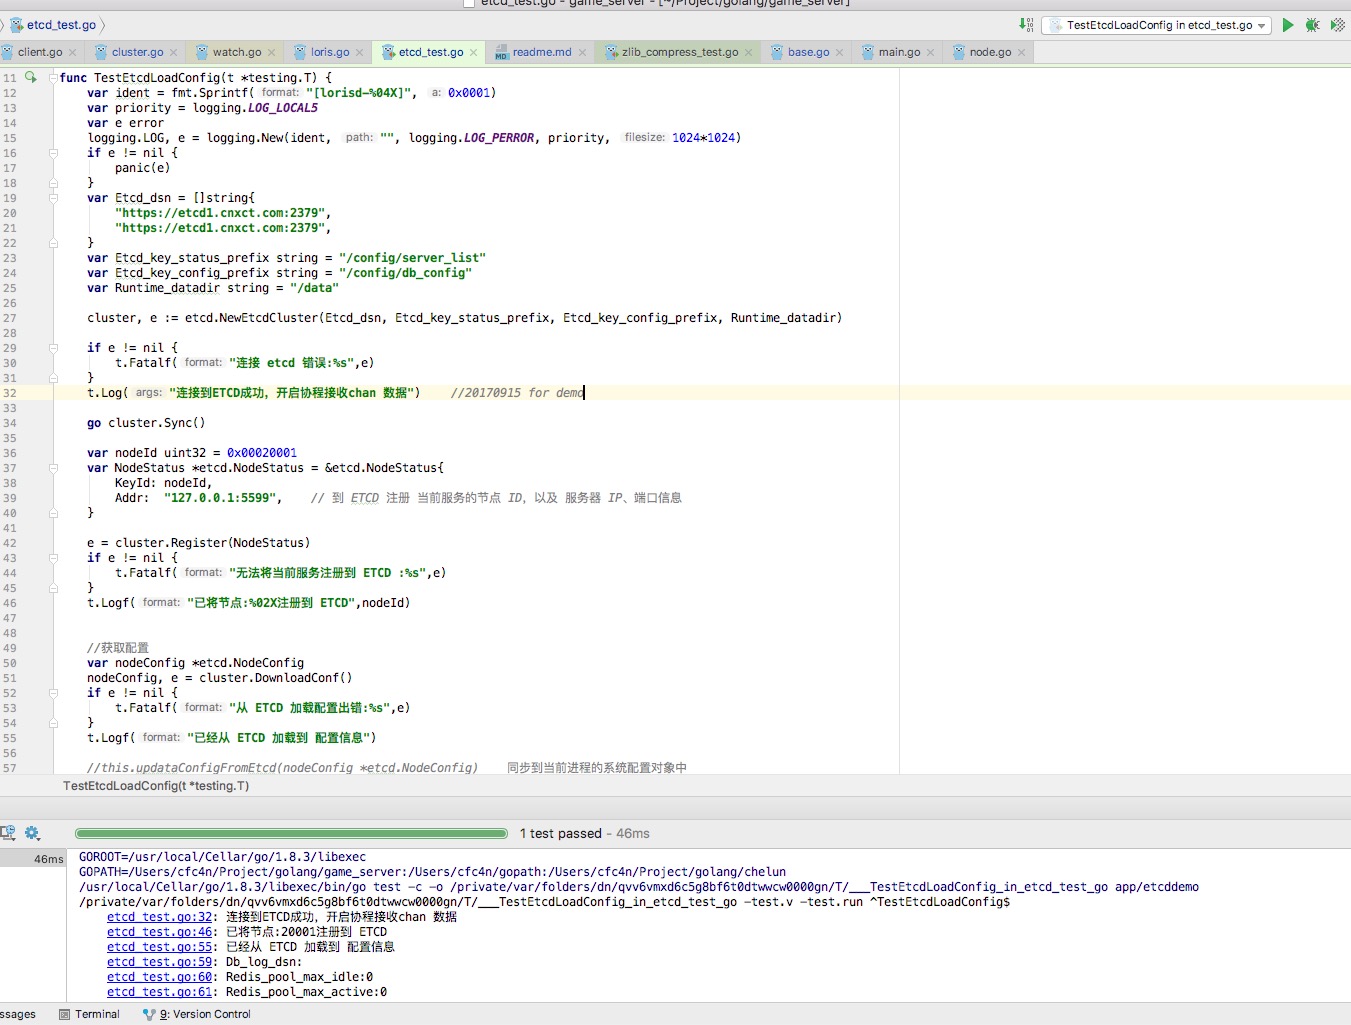
在游戏服务器节点启动后,把自己注册到 ETCD 后,将从 ETCD 加载自己节点所属的配置信息,比如若是 gateway 节点的话,加载自己将转发到逻辑服务器的节点列表,加载客户端版本过滤信息等等。伪代码如下:
func TestEtcdLoadConfig(t *testing.T) {
	var ident = fmt.Sprintf("[lorisd-%04X]", 0x0001)
	var priority = logging.LOG_LOCAL5
	var e error
	logging.LOG, e = logging.New(ident, "", logging.LOG_PERROR, priority, 1024*1024)
	if e != nil {
		panic(e)
	}
	var Etcd_dsn = []string{
		"https://etcd1.cnxct.com:2379",
		"https://etcd1.cnxct.com:2379",
	}
	var Etcd_key_status_prefix string = "/config/server_list"
	var Etcd_key_config_prefix string = "/config/db_config"
	var Runtime_datadir string = "/data"

	cluster, e := etcd.NewEtcdCluster(Etcd_dsn, Etcd_key_status_prefix, Etcd_key_config_prefix, Runtime_datadir)

	if e != nil {
		t.Fatalf("连接 etcd 错误:%s",e)
	}
	t.Log("连接到ETCD成功,开启协程接收chan 数据")

	go cluster.Sync()

	var nodeId uint32 = 0x00020001
	var NodeStatus *etcd.NodeStatus = &etcd.NodeStatus{
		KeyId: nodeId,
		Addr:  "127.0.0.1:5599",	// 到 ETCD 注册 当前服务的节点 ID,以及 服务器 IP、端口信息
	}

	e = cluster.Register(NodeStatus)
	if e != nil {
		t.Fatalf("无法将当前服务注册到 ETCD :%s",e)
	}
	t.Logf("已将节点:%02X注册到 ETCD",nodeId)


	//获取配置
	var nodeConfig *etcd.NodeConfig
	nodeConfig, e = cluster.DownloadConf()
	if e != nil {
		t.Fatalf("从 ETCD 加载配置出错:%s",e)
	}
	t.Logf("已经从 ETCD 加载到 配置信息")

	//this.updataConfigFromEtcd(nodeConfig *etcd.NodeConfig)	同步到当前进程的系统配置对象中

	t.Logf("Db_log_dsn:%v",nodeConfig.Conf.Db_log_dsn)
	t.Logf("Redis_pool_max_idle:%d",nodeConfig.Conf.Redis_pool_max_idle)
	t.Logf("Redis_pool_max_active:%d",nodeConfig.Conf.Redis_pool_max_active)

}
同样,在游戏集群中,经常会遇到配置的调整,在以前的方法中,都是挨个到服务器上修改配置再重新加载,或者高级一点的,自己研发 GMtools 推送消息到游戏的服务进程等等。我们在使用 etcd 时,使用 etcd 的 watch 功能,监控某个 KEY 的变动,若有变化,则立刻刷新到进程中的配置环境上,进行配置变更。当然,有些 DB 链接的 DSN,这些不会跟着改的。这种需求可以使用this.kapi.Watch(context.TODO(),keyName。
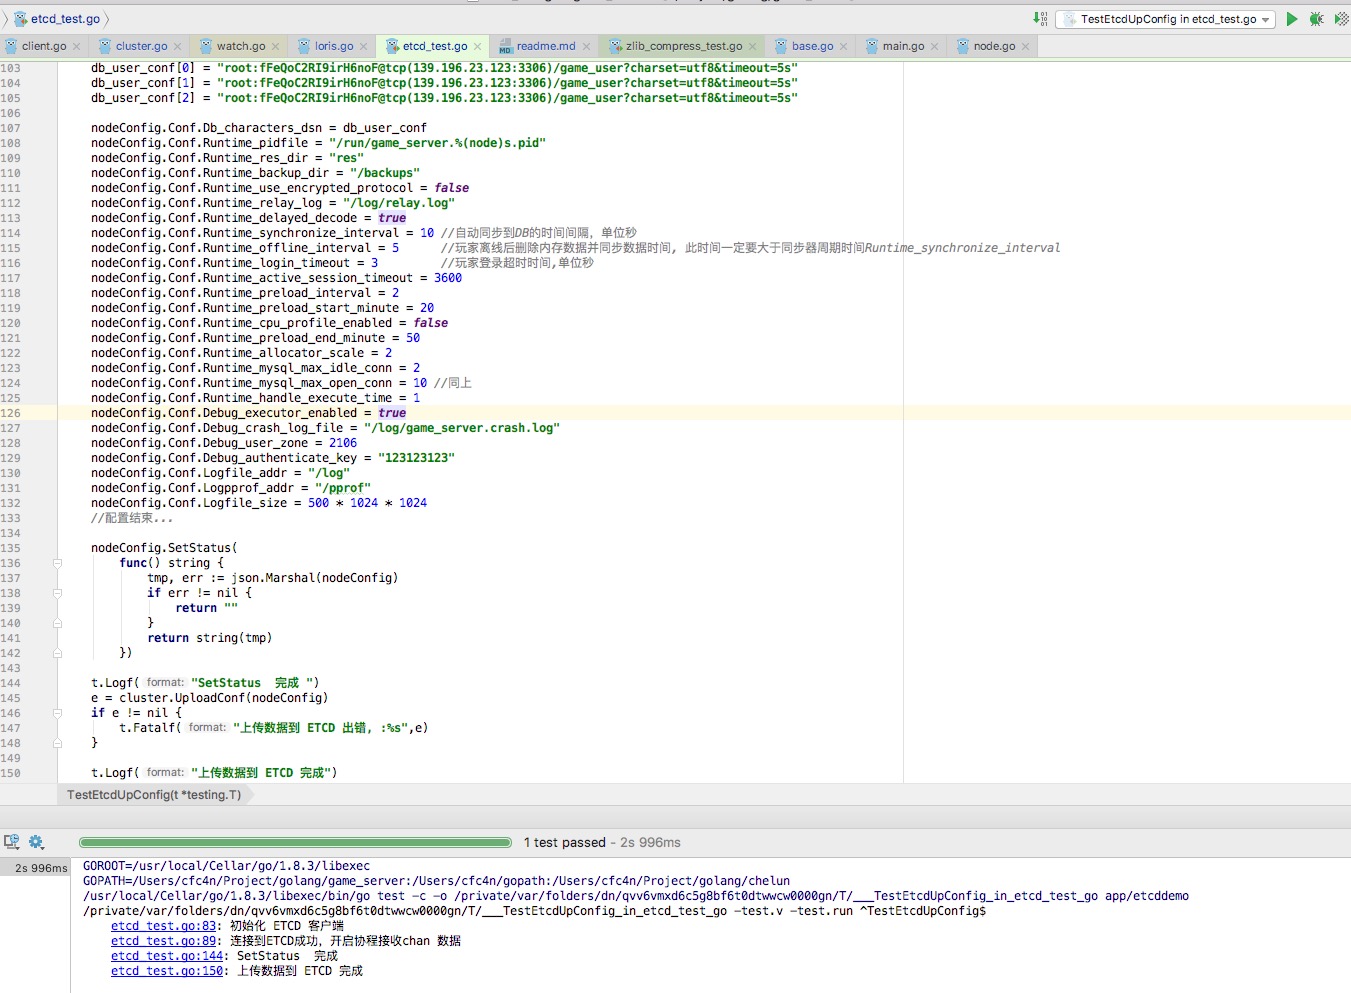
对于整个集群的配置管理,一般在 gmtools 里做统一配置管理,将配置写入到 ETCD,再有游戏服务器节点启动时加载,或者游戏服务器节点 watch 监控,遇到更新时也自动同步到其环境中。事例如下:
//设置 core服务器节点的配置信息
	nodeConfig := &etcd.NodeConfig{}
	nodeConfig.KeyId = 0x00020000 + node_id
	nodeConfig.Conf = &etcd.ConfValue{}
	nodeConfig.Conf.Db_characters_num = 3
	nodeConfig.Conf.Server_id = 1
	nodeConfig.Conf.Runtime_offline_interval = 5
	nodeConfig.Conf.Runtime_login_timeout = 3
	nodeConfig.Conf.Interfaces = "0.0.0.0:8866"
	nodeConfig.Conf.Runtime_res_dir = "res"
	nodeConfig.Conf.Db_world_dsn = "root:fFeQoC2RI9irH6noF@tcp(139.196.23.123:3306)/game_server?charset=utf8&timeout=5s"
	db_user_conf := make(map[uint8]string, 0)
	db_user_conf[0] = "root:fFeQoC2RI9irH6noF@tcp(139.196.23.123:3306)/game_user?charset=utf8&timeout=5s"
	db_user_conf[1] = "root:fFeQoC2RI9irH6noF@tcp(139.196.23.123:3306)/game_user?charset=utf8&timeout=5s"
	db_user_conf[2] = "root:fFeQoC2RI9irH6noF@tcp(139.196.23.123:3306)/game_user?charset=utf8&timeout=5s"

	nodeConfig.Conf.Db_characters_dsn = db_user_conf
	nodeConfig.Conf.Runtime_pidfile = "/run/game_server.%(node)s.pid"
	nodeConfig.Conf.Runtime_res_dir = "res"
	nodeConfig.Conf.Runtime_backup_dir = "/backups"
	nodeConfig.Conf.Runtime_use_encrypted_protocol = false
	nodeConfig.Conf.Runtime_relay_log = "/log/relay.log"
	nodeConfig.Conf.Runtime_delayed_decode = true
	nodeConfig.Conf.Runtime_synchronize_interval = 10 //自动同步到DB的时间间隔,单位秒
	nodeConfig.Conf.Runtime_offline_interval = 5      //玩家离线后删除内存数据并同步数据时间, 此时间一定要大于同步器周期时间Runtime_synchronize_interval
	nodeConfig.Conf.Runtime_login_timeout = 3         //玩家登录超时时间,单位秒
	nodeConfig.Conf.Runtime_active_session_timeout = 3600
	nodeConfig.Conf.Runtime_preload_interval = 2
	nodeConfig.Conf.Runtime_preload_start_minute = 20
	nodeConfig.Conf.Runtime_cpu_profile_enabled = false
	nodeConfig.Conf.Runtime_preload_end_minute = 50
	nodeConfig.Conf.Runtime_allocator_scale = 2
	nodeConfig.Conf.Runtime_mysql_max_idle_conn = 2
	nodeConfig.Conf.Runtime_mysql_max_open_conn = 10 //同上
	nodeConfig.Conf.Runtime_handle_execute_time = 1
	nodeConfig.Conf.Debug_executor_enabled = true
	nodeConfig.Conf.Debug_crash_log_file = "/log/game_server.crash.log"
	nodeConfig.Conf.Debug_user_zone = 2106
	nodeConfig.Conf.Debug_authenticate_key = "123123123"
	nodeConfig.Conf.Logfile_addr = "/log"
	nodeConfig.Conf.Logpprof_addr = "/pprof"
	nodeConfig.Conf.Logfile_size = 500 * 1024 * 1024
	//配置结束...

	nodeConfig.SetStatus(
		func() string {
			tmp, err := json.Marshal(nodeConfig)
			if err != nil {
				return ""
			}
			return string(tmp)
		})

	t.Logf("SetStatus  完成 ")
	e = cluster.UploadConf(nodeConfig)
	if e != nil {
		t.Fatalf("上传数据到 ETCD 出错, :%s",e)
	}

	t.Logf("上传数据到 ETCD 完成")
综上所述,对 etcd server 开启了 https 的加密传输,开启了 tls 的证书认证。可放心的在内网或者公网来传输数据,修改下发数据,确保不会恶意或无意的修改污染了。。。
附golang Test 的截图:
Coreos Etcd分布式集群 讨论 QQ 群:

 CFC4N的博客 由 CFC4N 创作,采用 署名—非商业性使用—相同方式共享 4.0 进行许可。基于https://www.cnxct.com上的作品创作。转载请注明转自:golang游戏项目中使用 tls、https 与etcd v3服务通讯
感谢分享!已推荐到《开发者头条》:https://toutiao.io/posts/cod6cg 欢迎点赞支持!
欢迎订阅《一码平川的独家号》https://toutiao.io/subjects/164069